One of the very important features or functionalities of Microsoft’s Windows 10, is its very handy ability to effectively help users search for files on their Personal Computers, while providing the option to do that via the internet from the comfort of the search box on Windows 10’s taskbar
The sad news attached to that however, is that the most recent number of Windows 10 updates released by Microsoft, have brought about a number of issues which have unfortunately affected how the search feature works both on files on the computer as well as while searching on the internet.
If you have discovered that your Windows 10 search feature is not working properly, then this article is for You.
There are various ways or methods that you can use to fix the issues in your Windows 10 search to get it working properly. This article will reveal them to you.

How To Solve Search Issues On Windows 10 Via A Windows Operating System Update
While bugs in the recent Windows 10 updates caused the problems with the operating systems search, Microsoft has in turn issued more updates as a response. This is expected to effectively fix the said search issues.
With that in mind, using Microsoft’s Windows Update feature to see if there is a new update available which can fix your Windows 10 search issues, still a viable option.
To fix your Windows 10 search issues via a Windows operating system update, simply:
- Open up the settings on Windows 10 by going to the Start menu and then selecting the Cog icon.
- Once there, select the ‘Update & Security’ option.
- At the top of the section of your computer screen, you will find out if there is an update provided by Microsoft, ready to be installed.
As stated earlier selecting the ‘Check for updates’ option to see if there are any updates available, is a viable option.
If it does happen that there are indeed updates that need installing, please make sure that you save all your work first, before starting the updates. Once done, proceed to begin the updates and then restart your PC.

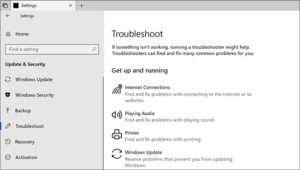
How To Solve Search Issues On Windows 10 Via The Troubleshooter
The troubleshooter is a very useful tool, because it will ask you questions about the specific problem that you are having (which in this case is complications with the search engine feature), and then proceed to carry out some tests to see what can be done.
To fix your Windows 10 search issues by using the Operating System’s built in troubleshooter, simply:
- Open up the settings on Windows 10 by going to the Start menu and then selecting the Cog icon.
- Once there, select the ‘Update & Security’ option. Doing that will launch Windows 10’s troubleshooter. It will be on the left section of the window that will pop up.
- Select the option called ‘Troubleshoot’.
- Next, scroll down until you see the ‘Search and Indexing’ option.
- Select it (the ‘Search and Indexing’ option) and then the ‘Run troubleshooter’ option.
Once you have gone through each of the steps of the built in troubleshooter, the issues with your Windows 10 search feature should be sorted.
How To Solve Search Issues On Windows 10 By Rebuilding The Index
Another way to fix your Windows 10 search issues, is by rebuilding the index. This is because the way Windows 10 indexes the folders and files on your Personal Computer, can sometimes cause issues. Issues which will in turn leading to the search feature on your Windows 10 not working the way that it should.
If none of the other steps above worked, this is another option that is worth trying.
To fix your Windows 10 search issues by rebuilding the index database for your Windows 10 operating system, simply:
- Go to the Settings section of your Windows 10 operating system.
- Once there, select the ‘Search’ option.
- Next, go to the left side of the menu and select the ‘Searching Windows’ option.
- After that, choose the ‘More Search Indexer Settings’ option.
- Once done, select the ‘Advanced Search Indexer Settings’ option.
- Next, select the option labelled as ‘Advanced’. It will be in the next window that appears.
- Once done, select the ‘Rebuild’ option.
- Select ‘OK’ and then allow the Windows 10 operating system work its magic.

How To Solve Search Issues On Windows 10 By Uninstalling Your Windows 10 Operating System’s Updates
Since the reason why the search feature on your Windows 10 is malfunctioning is because of issues in new updates for your operating system, uninstalling said Microsoft Windows 10 operating system updates is another option to consider when trying to solve the issue. Especially in a situation where Microsoft has not released an update fixing the issue and all the other solutions available have not been successful.
To fix your search issues by uninstalling the updates for your Windows 10 operating system, simply:
- Go to the Settings section.
- Once there, select the ‘Update & Security’ option.
- Next from the new window that pops up, select the ‘View update history’ option.
- Once done, select the ‘Uninstall updates’ option.
- Next, select the last update you installed before your search problems started.
And there you have it! How To Solve The Search Issues On your Windows 10 operating system. Using any of the solutions above should help you solve the search issues in your Windows 10.
Windows 10 is a series of personal computer operating systems developed and produced by Microsoft as part of its Windows NT family of operating systems.
Windows 10, is the successor to the Windows 8.1 operating systems. It was released to manufacturing on the 15th of July 2015, and was broadly released for retail sale on the 29th of July, 2015.
Windows 10 is designed to adapt its user interface based on the type of device being used and available input methods. It also offers two separate user interface modes: a user interface optimized for mouse and keyboard, and a “Tablet mode” designed for touchscreens.
Was this article helpful? Are there any other How To topics that you would like us to write on? Feel free to reach out to Mpesa Pay in the comment section.


